# VLA (2) SmolVLA, ACT
This document explains how to use **XLeRobot** for:
1. Training and running **SmolVLA** with a **bimanual SO-101** setup and **three-camera data collection**
2. Training and running **ACT (Action Chunking with Transformers)** policy
3. Using **VR Control** for XLeRobot
 ---
## 1) Overview
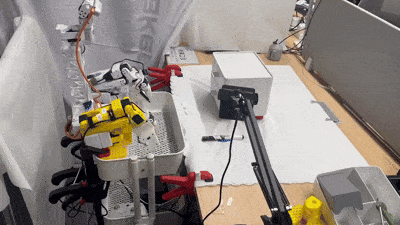
XLeRobot is a LeRobot-based setup that adds:
- **BiSO101Follower** (bimanual follower arm)
- **BiSO101Leader** (bimanual teleoperation/leader arm)
- **Independent** control of left/right arms + **synchronized** bimanual operation
- **Three-camera** recording configuration:
- `front_cam`
- `hand_cam`
- `side_cam`
---
## 1) Overview
XLeRobot is a LeRobot-based setup that adds:
- **BiSO101Follower** (bimanual follower arm)
- **BiSO101Leader** (bimanual teleoperation/leader arm)
- **Independent** control of left/right arms + **synchronized** bimanual operation
- **Three-camera** recording configuration:
- `front_cam`
- `hand_cam`
- `side_cam`
 ### References
- [SmolVLA base model](https://huggingface.co/lerobot/smolvla_base)
- [ACT documentation](https://huggingface.co/docs/lerobot/en/act)
- [XLeRobot / LeRobot fork usage](https://github.com/kahowang/lerobot)
- [Rumi](https://github.com/MakerModsRobotics/Rumi)
- [XLeRobot improvement upgrades](https://github.com/MakerModsRobotics/xlerobot_improvements)
---
## 2) Demo Tasks (What SmolVLA Can Learn with ~20 Episodes)
### Demo 1 - Drawer + Pick + Place + Grasp (Bimanual)
After training on **~20 episodes**, XLeRobot can:
1. Pull open a drawer
2. Pick an object
3. Place the object into the drawer
4. Push the drawer in
### References
- [SmolVLA base model](https://huggingface.co/lerobot/smolvla_base)
- [ACT documentation](https://huggingface.co/docs/lerobot/en/act)
- [XLeRobot / LeRobot fork usage](https://github.com/kahowang/lerobot)
- [Rumi](https://github.com/MakerModsRobotics/Rumi)
- [XLeRobot improvement upgrades](https://github.com/MakerModsRobotics/xlerobot_improvements)
---
## 2) Demo Tasks (What SmolVLA Can Learn with ~20 Episodes)
### Demo 1 - Drawer + Pick + Place + Grasp (Bimanual)
After training on **~20 episodes**, XLeRobot can:
1. Pull open a drawer
2. Pick an object
3. Place the object into the drawer
4. Push the drawer in
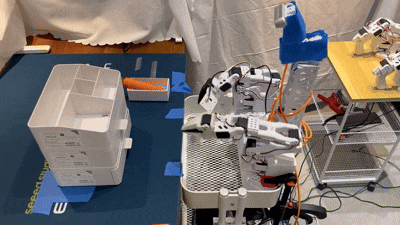 **Key aspects:**
- **One-shot grasp** of the drawer handle (avoid jitter during data collection)
- While the **left arm** pulls the drawer, the **right arm** must **precisely** grasp the object's center
- **Accurate one-shot placement** into the drawer and smooth "push-in" close
### Demo 2 - Pencil Case Zipper (Fine Manipulation)
After training on **~20 episodes**, XLeRobot can:
1. Grasp the zipper pull tab
2. Grasp the pencil case handle and stabilize the case
3. Pull the zipper tab to open the zipper smoothly
**Key aspects:**
- **One-shot grasp** of the drawer handle (avoid jitter during data collection)
- While the **left arm** pulls the drawer, the **right arm** must **precisely** grasp the object's center
- **Accurate one-shot placement** into the drawer and smooth "push-in" close
### Demo 2 - Pencil Case Zipper (Fine Manipulation)
After training on **~20 episodes**, XLeRobot can:
1. Grasp the zipper pull tab
2. Grasp the pencil case handle and stabilize the case
3. Pull the zipper tab to open the zipper smoothly
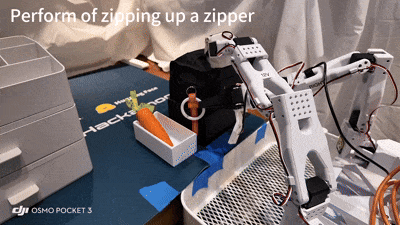 **Key difficulties:**
- The zipper pull is often in a **top-down camera blind spot**, requiring **one-shot** grasp (avoid re-grasp)
- Maintain consistent pulling height to avoid lifting up/down (no "upward yank" or "downward drag")
---
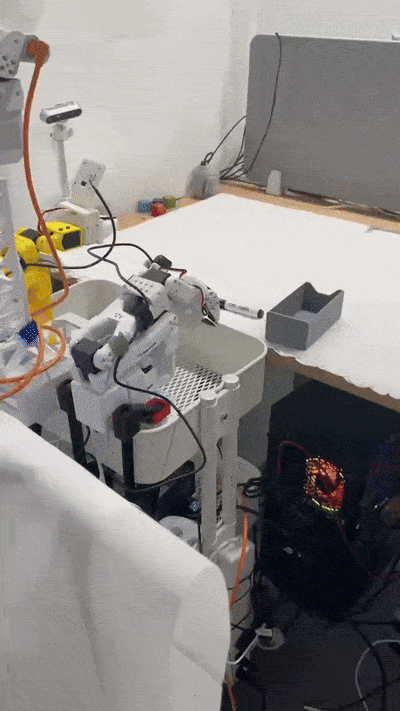
## 3) Hardware / Configuration Notes
### Camera Placement (Three Cameras)
Recommended configuration:
- `front_cam` × 1
- `hand_cam` × 1
- `side_cam` × 1
> **Note:** In practice, consistent camera placement and stable lighting are critical for learning stable manipulation.
### Action Dimension Handling (Important)
A bimanual SO-101 robot has **12 action dimensions**:
- 6 joints × 2 arms = **12**
**SmolVLA automatically detects and handles action dimensions** without manual configuration:
- During training: **12-D → padded to 32-D** (`max_action_dim`)
- During inference: **32-D → cropped back to original 12-D**
**Conceptual code path:**
```python
# Training: 12D -> pad to 32D
actions = pad_vector(batch[ACTION], self.config.max_action_dim)
# Inference: 32D -> crop back to 12D
original_action_dim = self.config.action_feature.shape[0] # auto-detected: 12
actions = actions[:, :, :original_action_dim]
```
Unlike other VLA models (e.g., xVLA) that may require manual `action_mode` configuration, SmolVLA's dynamic padding supports any action space ≤ 32D.
---
## 4) Installation & Environment Setup (Linux)
### A. Install Miniconda (Example)
```bash
wget https://repo.anaconda.com/miniconda/Miniconda3-latest-Linux-x86_64.sh
bash Miniconda3-latest-Linux-x86_64.sh
# Restart terminal, then verify
conda --version
```
### B. Create & Activate Environment
```bash
conda create -n lerobot python=3.10
conda activate lerobot
```
> **Note:** Activate this environment every time you use LeRobot/XLeRobot:
> ```bash
> conda activate lerobot
> ```
### C. Install System Dependencies (FFmpeg)
```bash
conda install -c conda-forge ffmpeg
```
### D. Clone Repository & Install Dependencies
```bash
git clone https://github.com/kahowang/lerobot.git
cd lerobot
# Install LeRobot with Feetech motor support (required for SO-101)
pip install -e ".[feetech]"
# Install SmolVLA dependencies
pip install -e ".[smolvla]"
```
---
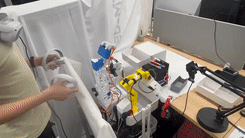
## 5) Data Collection (Three-Camera, Bimanual Teleop)
Use `lerobot-record` to record bimanual demonstrations with three cameras.
Replace `${HF_USER}` and `your_dataset_name` with your Hugging Face username and dataset name.
```bash
lerobot-record \
--robot.type=bi_so101_follower \
--robot.left_arm_port=/dev/ttyACM0 \
--robot.right_arm_port=/dev/ttyACM1 \
--robot.id=bimanual_follower \
--robot.cameras='{
"front_cam": {"type": "opencv", "index_or_path": 0, "width": 640, "height": 480, "fps": 30},
"hand_cam": {"type": "opencv", "index_or_path": 1, "width": 640, "height": 480, "fps": 30},
"side_cam": {"type": "opencv", "index_or_path": 2, "width": 640, "height": 480, "fps": 30}
}' \
--teleop.type=bi_so101_leader \
--teleop.left_arm_port=/dev/ttyACM2 \
--teleop.right_arm_port=/dev/ttyACM3 \
--teleop.id=bimanual_leader \
--dataset.repo_id=${HF_USER}/your_dataset_name \
--dataset.single_task="Your task description here" \
--dataset.num_episodes=50
```
### Parameter Tips
1. Ports (`/dev/ttyACM*`) must match your actual USB device mapping
2. `dataset.single_task` should be concise but specific (improves reproducibility)
3. For quick iteration, start with 20 episodes and scale up
---
## 6) Training Policies
### 6.1) Train SmolVLA
```bash
lerobot-train \
--policy.path=lerobot/smolvla_base \
--dataset.repo_id=${HF_USER}/your_dataset_name \
--batch_size=64 \
--steps=20000 \
--output_dir=outputs/train/smolvla_three_cameras \
--job_name=smolvla_training_three_cameras \
--policy.device=cuda \
--wandb.enable=true
```
**Notes:**
1. `--policy.path=lerobot/smolvla_base` points to the SmolVLA base policy
2. Adjust `--steps` based on dataset size and task complexity
3. If you do not have a GPU, set `--policy.device=cpu` (training will be slow)
### 6.2) Train ACT (Action Chunking with Transformers)
ACT is an imitation-learning method that predicts short action chunks instead of single steps. It often achieves high success rates with teleoperated data.
**Basic Training Command:**
```bash
python -m lerobot.scripts.train \
--dataset.repo_id=${HF_USER}/your_dataset_name \
--policy.type=act \
--output_dir=outputs/train/act_bimanual_demo \
--job_name=act_training_bimanual \
--policy.device=cuda \
--policy.repo_id=${HF_USER}/act_bimanual_demo \
--wandb.enable=true
```
**Alternative using `lerobot-train`:**
```bash
lerobot-train \
--policy.type=act \
--dataset.repo_id=${HF_USER}/your_dataset_name \
--output_dir=outputs/train/act_bimanual_demo \
--job_name=act_training_bimanual \
--policy.device=cuda \
--wandb.enable=true
```
**Training Notes:**
- Checkpoints are written to `outputs/train//checkpoints/`
- ACT typically trains in a few hours on a single GPU (~80M parameters)
- A checkpoint at 80k steps takes about 1h45 on an Nvidia A100
- For Apple Silicon: use `--policy.device=mps`
**Resume Training from Checkpoint:**
```bash
python -m lerobot.scripts.train \
--config_path=outputs/train/act_bimanual_demo/checkpoints/last/pretrained_model/train_config.json \
--resume=true
```
---
## 7) Inference/Evaluation
### 7.1) SmolVLA Inference
Typical pattern to run policy inference and log evaluation episodes:
```bash
lerobot-record \
--robot.type=bi_so101_follower \
--robot.left_arm_port=/dev/ttyACM0 \
--robot.right_arm_port=/dev/ttyACM1 \
--robot.id=bimanual_follower \
--robot.cameras='{
"front_cam": {"type": "opencv", "index_or_path": 0, "width": 640, "height": 480, "fps": 30},
"hand_cam": {"type": "opencv", "index_or_path": 1, "width": 640, "height": 480, "fps": 30},
"side_cam": {"type": "opencv", "index_or_path": 2, "width": 640, "height": 480, "fps": 30}
}' \
--dataset.single_task="Your task description here" \
--dataset.repo_id=${HF_USER}/eval_results \
--dataset.num_episodes=10 \
--policy.path=${HF_USER}/smolvla_three_cameras
```
**Notes:**
1. `--policy.path` should point to your trained policy checkpoint / uploaded policy
2. `eval_results` is a separate dataset repo for evaluation logs (recommended)
### 7.2) ACT Inference
**Using `lerobot-record`:**
```bash
lerobot-record \
--robot.type=bi_so101_follower \
--robot.left_arm_port=/dev/ttyACM0 \
--robot.right_arm_port=/dev/ttyACM1 \
--robot.id=bimanual_follower \
--robot.cameras='{
"front_cam": {"type": "opencv", "index_or_path": 0, "width": 640, "height": 480, "fps": 30},
"hand_cam": {"type": "opencv", "index_or_path": 1, "width": 640, "height": 480, "fps": 30},
"side_cam": {"type": "opencv", "index_or_path": 2, "width": 640, "height": 480, "fps": 30}
}' \
--dataset.single_task="Your task description here" \
--dataset.repo_id=${HF_USER}/eval_act_results \
--dataset.num_episodes=10 \
--policy.path=${HF_USER}/act_bimanual_demo
```
**Using `python -m lerobot.record`:**
```bash
python -m lerobot.record \
--robot.type=bi_so101_follower \
--robot.left_arm_port=/dev/ttyACM0 \
--robot.right_arm_port=/dev/ttyACM1 \
--dataset.repo_id=${HF_USER}/eval_act_results \
--policy.path=${HF_USER}/act_bimanual_demo \
--episodes=10
```
**Notes:**
- The policy will execute autonomously on the robot
- Evaluation results are saved to the specified dataset repo
- Compare evaluation episodes with training demonstrations to assess performance
---
## 8) VR Control for XLeRobot
**Key difficulties:**
- The zipper pull is often in a **top-down camera blind spot**, requiring **one-shot** grasp (avoid re-grasp)
- Maintain consistent pulling height to avoid lifting up/down (no "upward yank" or "downward drag")
---
## 3) Hardware / Configuration Notes
### Camera Placement (Three Cameras)
Recommended configuration:
- `front_cam` × 1
- `hand_cam` × 1
- `side_cam` × 1
> **Note:** In practice, consistent camera placement and stable lighting are critical for learning stable manipulation.
### Action Dimension Handling (Important)
A bimanual SO-101 robot has **12 action dimensions**:
- 6 joints × 2 arms = **12**
**SmolVLA automatically detects and handles action dimensions** without manual configuration:
- During training: **12-D → padded to 32-D** (`max_action_dim`)
- During inference: **32-D → cropped back to original 12-D**
**Conceptual code path:**
```python
# Training: 12D -> pad to 32D
actions = pad_vector(batch[ACTION], self.config.max_action_dim)
# Inference: 32D -> crop back to 12D
original_action_dim = self.config.action_feature.shape[0] # auto-detected: 12
actions = actions[:, :, :original_action_dim]
```
Unlike other VLA models (e.g., xVLA) that may require manual `action_mode` configuration, SmolVLA's dynamic padding supports any action space ≤ 32D.
---
## 4) Installation & Environment Setup (Linux)
### A. Install Miniconda (Example)
```bash
wget https://repo.anaconda.com/miniconda/Miniconda3-latest-Linux-x86_64.sh
bash Miniconda3-latest-Linux-x86_64.sh
# Restart terminal, then verify
conda --version
```
### B. Create & Activate Environment
```bash
conda create -n lerobot python=3.10
conda activate lerobot
```
> **Note:** Activate this environment every time you use LeRobot/XLeRobot:
> ```bash
> conda activate lerobot
> ```
### C. Install System Dependencies (FFmpeg)
```bash
conda install -c conda-forge ffmpeg
```
### D. Clone Repository & Install Dependencies
```bash
git clone https://github.com/kahowang/lerobot.git
cd lerobot
# Install LeRobot with Feetech motor support (required for SO-101)
pip install -e ".[feetech]"
# Install SmolVLA dependencies
pip install -e ".[smolvla]"
```
---
## 5) Data Collection (Three-Camera, Bimanual Teleop)
Use `lerobot-record` to record bimanual demonstrations with three cameras.
Replace `${HF_USER}` and `your_dataset_name` with your Hugging Face username and dataset name.
```bash
lerobot-record \
--robot.type=bi_so101_follower \
--robot.left_arm_port=/dev/ttyACM0 \
--robot.right_arm_port=/dev/ttyACM1 \
--robot.id=bimanual_follower \
--robot.cameras='{
"front_cam": {"type": "opencv", "index_or_path": 0, "width": 640, "height": 480, "fps": 30},
"hand_cam": {"type": "opencv", "index_or_path": 1, "width": 640, "height": 480, "fps": 30},
"side_cam": {"type": "opencv", "index_or_path": 2, "width": 640, "height": 480, "fps": 30}
}' \
--teleop.type=bi_so101_leader \
--teleop.left_arm_port=/dev/ttyACM2 \
--teleop.right_arm_port=/dev/ttyACM3 \
--teleop.id=bimanual_leader \
--dataset.repo_id=${HF_USER}/your_dataset_name \
--dataset.single_task="Your task description here" \
--dataset.num_episodes=50
```
### Parameter Tips
1. Ports (`/dev/ttyACM*`) must match your actual USB device mapping
2. `dataset.single_task` should be concise but specific (improves reproducibility)
3. For quick iteration, start with 20 episodes and scale up
---
## 6) Training Policies
### 6.1) Train SmolVLA
```bash
lerobot-train \
--policy.path=lerobot/smolvla_base \
--dataset.repo_id=${HF_USER}/your_dataset_name \
--batch_size=64 \
--steps=20000 \
--output_dir=outputs/train/smolvla_three_cameras \
--job_name=smolvla_training_three_cameras \
--policy.device=cuda \
--wandb.enable=true
```
**Notes:**
1. `--policy.path=lerobot/smolvla_base` points to the SmolVLA base policy
2. Adjust `--steps` based on dataset size and task complexity
3. If you do not have a GPU, set `--policy.device=cpu` (training will be slow)
### 6.2) Train ACT (Action Chunking with Transformers)
ACT is an imitation-learning method that predicts short action chunks instead of single steps. It often achieves high success rates with teleoperated data.
**Basic Training Command:**
```bash
python -m lerobot.scripts.train \
--dataset.repo_id=${HF_USER}/your_dataset_name \
--policy.type=act \
--output_dir=outputs/train/act_bimanual_demo \
--job_name=act_training_bimanual \
--policy.device=cuda \
--policy.repo_id=${HF_USER}/act_bimanual_demo \
--wandb.enable=true
```
**Alternative using `lerobot-train`:**
```bash
lerobot-train \
--policy.type=act \
--dataset.repo_id=${HF_USER}/your_dataset_name \
--output_dir=outputs/train/act_bimanual_demo \
--job_name=act_training_bimanual \
--policy.device=cuda \
--wandb.enable=true
```
**Training Notes:**
- Checkpoints are written to `outputs/train//checkpoints/`
- ACT typically trains in a few hours on a single GPU (~80M parameters)
- A checkpoint at 80k steps takes about 1h45 on an Nvidia A100
- For Apple Silicon: use `--policy.device=mps`
**Resume Training from Checkpoint:**
```bash
python -m lerobot.scripts.train \
--config_path=outputs/train/act_bimanual_demo/checkpoints/last/pretrained_model/train_config.json \
--resume=true
```
---
## 7) Inference/Evaluation
### 7.1) SmolVLA Inference
Typical pattern to run policy inference and log evaluation episodes:
```bash
lerobot-record \
--robot.type=bi_so101_follower \
--robot.left_arm_port=/dev/ttyACM0 \
--robot.right_arm_port=/dev/ttyACM1 \
--robot.id=bimanual_follower \
--robot.cameras='{
"front_cam": {"type": "opencv", "index_or_path": 0, "width": 640, "height": 480, "fps": 30},
"hand_cam": {"type": "opencv", "index_or_path": 1, "width": 640, "height": 480, "fps": 30},
"side_cam": {"type": "opencv", "index_or_path": 2, "width": 640, "height": 480, "fps": 30}
}' \
--dataset.single_task="Your task description here" \
--dataset.repo_id=${HF_USER}/eval_results \
--dataset.num_episodes=10 \
--policy.path=${HF_USER}/smolvla_three_cameras
```
**Notes:**
1. `--policy.path` should point to your trained policy checkpoint / uploaded policy
2. `eval_results` is a separate dataset repo for evaluation logs (recommended)
### 7.2) ACT Inference
**Using `lerobot-record`:**
```bash
lerobot-record \
--robot.type=bi_so101_follower \
--robot.left_arm_port=/dev/ttyACM0 \
--robot.right_arm_port=/dev/ttyACM1 \
--robot.id=bimanual_follower \
--robot.cameras='{
"front_cam": {"type": "opencv", "index_or_path": 0, "width": 640, "height": 480, "fps": 30},
"hand_cam": {"type": "opencv", "index_or_path": 1, "width": 640, "height": 480, "fps": 30},
"side_cam": {"type": "opencv", "index_or_path": 2, "width": 640, "height": 480, "fps": 30}
}' \
--dataset.single_task="Your task description here" \
--dataset.repo_id=${HF_USER}/eval_act_results \
--dataset.num_episodes=10 \
--policy.path=${HF_USER}/act_bimanual_demo
```
**Using `python -m lerobot.record`:**
```bash
python -m lerobot.record \
--robot.type=bi_so101_follower \
--robot.left_arm_port=/dev/ttyACM0 \
--robot.right_arm_port=/dev/ttyACM1 \
--dataset.repo_id=${HF_USER}/eval_act_results \
--policy.path=${HF_USER}/act_bimanual_demo \
--episodes=10
```
**Notes:**
- The policy will execute autonomously on the robot
- Evaluation results are saved to the specified dataset repo
- Compare evaluation episodes with training demonstrations to assess performance
---
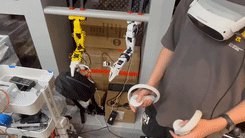
## 8) VR Control for XLeRobot
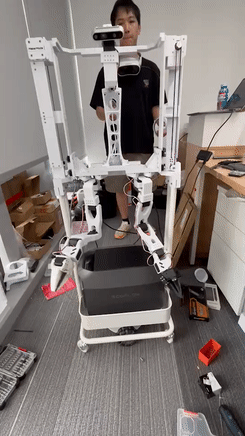 ### Robot: Rumi
Rumi is a new-generation bimanual robot with a liftable chassis:
[Rumi](https://www.makermods.ai/rumi)

### Repositories
1. [VR controller repo](https://github.com/IIMFINE/lerobot_vr_controller.git)
2. [LeRobot repo (fork)](https://github.com/IIMFINE/lerobot.git)
### Features
1. VR → robot arm mapping
2. Supports:
- Inverse kinematics (IK) solving
- Joint-space → motor command conversion
### XLeRobot integrates ROS 2
For VR control, follow the repository's README to configure VR devices, ROS 2 nodes, and robot drivers.
---
### Robot: Rumi
Rumi is a new-generation bimanual robot with a liftable chassis:
[Rumi](https://www.makermods.ai/rumi)

### Repositories
1. [VR controller repo](https://github.com/IIMFINE/lerobot_vr_controller.git)
2. [LeRobot repo (fork)](https://github.com/IIMFINE/lerobot.git)
### Features
1. VR → robot arm mapping
2. Supports:
- Inverse kinematics (IK) solving
- Joint-space → motor command conversion
### XLeRobot integrates ROS 2
For VR control, follow the repository's README to configure VR devices, ROS 2 nodes, and robot drivers.
---
 ## 9) Practical Tips / Common Pitfalls
### Data Quality
1. Aim for one-shot grasps during demonstrations (avoid micro-corrections)
2. Keep camera viewpoints consistent between recording and inference
3. Maintain stable lighting and avoid motion blur
### Bimanual Coordination
For tasks like drawers:
- **Left arm:** stable pulling trajectory
- **Right arm:** precise pick/place with minimal hesitation
## 9) Practical Tips / Common Pitfalls
### Data Quality
1. Aim for one-shot grasps during demonstrations (avoid micro-corrections)
2. Keep camera viewpoints consistent between recording and inference
3. Maintain stable lighting and avoid motion blur
### Bimanual Coordination
For tasks like drawers:
- **Left arm:** stable pulling trajectory
- **Right arm:** precise pick/place with minimal hesitation
 ### Device Ports
If ports change after reboot, consider using persistent udev rules to stabilize device naming.
---
### Device Ports
If ports change after reboot, consider using persistent udev rules to stabilize device naming.
---
 ## 10) Quick Checklist
- [ ] `conda activate lerobot`
- [ ] Three cameras connected and indices correct (0/1/2)
- [ ] Follower ports correct (`/dev/ttyACM0`, `/dev/ttyACM1`)
- [ ] Leader ports correct (`/dev/ttyACM2`, `/dev/ttyACM3`)
- [ ] Dataset repo ID and task description set
- [ ] Training runs on correct device (cuda vs cpu)
- [ ] Inference uses the correct trained policy path
---
## Appendix: Links
### Official Documentation
- [LeRobot Docs](https://huggingface.co/docs/lerobot)
- [ACT Documentation](https://huggingface.co/docs/lerobot/en/act)
- [Imitation Learning on Real-World Robots](https://huggingface.co/docs/lerobot/il_robots)
- [Getting Started with Real-World Robots](https://huggingface.co/docs/lerobot/en/getting_started_real_world_robot)
### Models & Repositories
- [SmolVLA base](https://huggingface.co/lerobot/smolvla_base)
- [ACT example model](https://huggingface.co/lerobot/act_aloha_sim_transfer_cube_human)
- [XLeRobot fork usage](https://github.com/kahowang/lerobot)
- [Rumi robot](https://www.makermods.ai/rumi)
- [VR controller](https://github.com/IIMFINE/lerobot_vr_controller.git)
- [LeRobot fork](https://github.com/IIMFINE/lerobot.git)
## 10) Quick Checklist
- [ ] `conda activate lerobot`
- [ ] Three cameras connected and indices correct (0/1/2)
- [ ] Follower ports correct (`/dev/ttyACM0`, `/dev/ttyACM1`)
- [ ] Leader ports correct (`/dev/ttyACM2`, `/dev/ttyACM3`)
- [ ] Dataset repo ID and task description set
- [ ] Training runs on correct device (cuda vs cpu)
- [ ] Inference uses the correct trained policy path
---
## Appendix: Links
### Official Documentation
- [LeRobot Docs](https://huggingface.co/docs/lerobot)
- [ACT Documentation](https://huggingface.co/docs/lerobot/en/act)
- [Imitation Learning on Real-World Robots](https://huggingface.co/docs/lerobot/il_robots)
- [Getting Started with Real-World Robots](https://huggingface.co/docs/lerobot/en/getting_started_real_world_robot)
### Models & Repositories
- [SmolVLA base](https://huggingface.co/lerobot/smolvla_base)
- [ACT example model](https://huggingface.co/lerobot/act_aloha_sim_transfer_cube_human)
- [XLeRobot fork usage](https://github.com/kahowang/lerobot)
- [Rumi robot](https://www.makermods.ai/rumi)
- [VR controller](https://github.com/IIMFINE/lerobot_vr_controller.git)
- [LeRobot fork](https://github.com/IIMFINE/lerobot.git)